Set-up Ai-Online Store_12-10-2020

Written by Vladimir Bigdan
Updated at May 25th, 2021
1. Ai-Online store
Ai-Online allows your customers to view the menu and make orders using their own devices (Mobile/Laptop) by just scanning a QR code displayed on the tables. It also has a takeaway version, where your customers can order from the website and opt for delivery or Pick-up. You can easily set-up your online store using any one of the three methods explained in the next section.
2. Setting up online store
You can set up your online store using any one of the three method that seems suitable.
2.1 Using Ai-POS
- Open your Ai-POS.
- Tap on Administration.
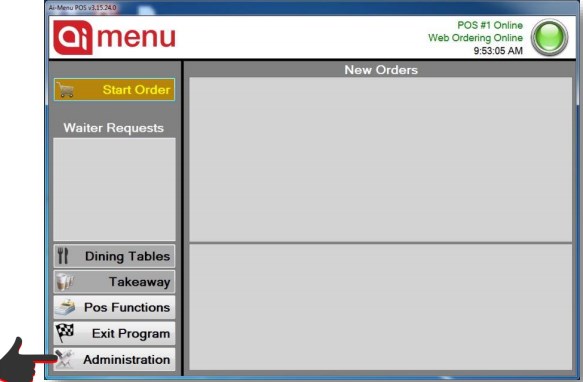
(Note: you can also directly go into administration settings using the Ai-Adminapp ) - This will open the Administration settings.
- Tap on Tools

- Now tap on Online Settings.

- Tapping on Online Settings opens Ai-Manager in your browser.
- The Ai-Manager automatically gets logged in to your account when accessed through Ai-POS or Ai-Admin.
- In the left pane menu, go to Restaurant Settings -> Online Store Setup -> Online Store tab, select the required restaurant using the Select
Restaurant drop-down list.
- Then scroll down in the same Online Store tab and turn ON online storeby clicking on the Online Store Active toggle button.

- Once done, tap on Update Settings.
- Once the setting has been saved, you can start configuring your online store.
- The URL’s for your takeaway store and dining store (with default table number 1) are shown just below the Select Restaurant drop-down box

- Enter the wait time. This function is for the takeaway store and this determines the time duration between the time of ordering and the first available time slot available for ordering, in the Ai-Online
Takeaway checkout page. - Enter the title text and title description if needed, for your online store.
- Pickup, Delivery, and Dine-in cannot be enabled unless their payment methods have been set. Meaning that at least one of the payment methods should be active for an order type to be enabled.
- So, tap on the Payments tab to set-up the payment methods for each order type.

- In the Payments tab, tap on Cash to setup cash payments.
- Once Cash is selected, tap on the Active checkbox to activate the Cash payment method.
- And after making Cash as active, select the order type where you want to add Cash as a payment method. E.g. Checking the Available for Pickup checkbox adds the Cash payment method in the Pickup checkout page.
- Now tap on PayPal.

- Enter your PayPal email and Secret in their respective fields.
(Note: Refer “Ai-Menu–PayPal Integration Guide”, to set-up your PayPal business account and generate the Secret key) - Enter the Surcharge % you want to charge customers when paying through PayPal.
- Once done, tap on the Active checkbox to activate the PayPal payment method.
- Now, select the order type where you want to add PayPal as a payment method.
- Now, tap on Credit Card.

- Select the Credit Card payment provider as Stripe, if you are using Stripe.
- Enter the publishable key and Token in their respective fields.
(Note: Refer “Ai-Menu–Stripe Integration Guide”, to set-up your Stripe account and generate the Publishable key and Token) - Set your surcharge %.
- Once done, tap on the Active checkbox to activate the Stripe payment method.
- Now, select the order type where you want to add Stripe as a payment method. If you are using Safe2Pay, select Safe2Pay in the Select Provider dropdown box and repeat the same steps mentioned above.
- Once done, tap on Update Settings.
- Once the settings are saved, go to the Online Store tab.

- Under the Online Store tab, enable the required order types by clicking on the Enable {order type} checkbox.
(Note: If all payment methods are disabled for a particular order type, then that order type gets disabled (i.e. gets unchecked in the Online Store tab)). - Once done, click on Update Settings.
- Now tap on the Delivery tab, to configure the delivery settings.
- Enter the preferred delivery area selection using different options available under the Delivery Area Option drop-down box.
- Usually, Postcodes are used.
- Enter the address of the restaurant in the Restaurant Address field and tap on Find Geo-Location. You can now notice your restaurant being marked on the map. Once you enter the address, the latitude and longitude are set automatically.

- Enter the required postcodes where you want to deliver, in the Delivery Postcodes field.

- If you have a delivery partner, select from the Select Delivery Partner drop-down box.
- And enter the corresponding Delivery API key.
- If you have in-house delivery, just select Unknown in the Select Delivery
Partner drop-down and leave the Delivery API key field empty. - Enter the delivery fee. If you don’t want to charge for delivery enter 0.
- Once done, click on Update Settings.
- Now, click on the Open Hours tab to set the online store timings.
 (Note: The Open Hours settings only applies to the Takeaway store)
 - Set the opening and closing hours for your online takeaway store in the
Open From and Open To fields respectively. - The online takeaway store can be closed for a particular day by turning on/off the Active toggle button for that day.
- When the Delivery time checkbox is unchecked, the store hours apply to both delivery and pickup.
- If you want separate store hours for delivery and pickup, click on the
Delivery Time checkbox and now you can see separate fields for delivery and pickup.
- Now you can set the delivery and pickup time individually.
- Once done, click on Update Settings.
- Now tap on the Admin tab.
- If you wish to receive the invoices for every order made using the online store, then check the
Email Invoice To Supplier checkbox and enter your email ID in the Supplier Email List text box. - If you want to send Invoices to the customers for their order, check the
Email Invoice To Customer checkbox
- Once done, tap on Update Settings.
- Now your online store is configured and ready to use.
2.2 Using your Web Browser
The online store can be set up using your web browser on your mobile phone or
PC.
- Open your web browser (E.g. Google Chrome).
- Enter the following URL https://www.ai-menu.com/manager in your
browser. - Enter your Ai-Manager Username and Password.
- Click Secure Login.

- It will take you to your Ai-Manager account and you can set-up your online store by following the same procedure discussed above.
2.3 For Cloud Only Systems
For cloud-only systems, you can set up your online store using your Ai-Menu tablets.
- Go to the menu screen in your Ai-Menu tablet.
- Tap on Ai-Online Client.

- This will open the Ai-Online Client.
- Tap on the Three Dots on the top right of the screen.

- Now click on Web Portal.

- This will take you to your Ai-Manager account, where you can set up and configure your online store as discussed in the previous section.
Thus, by using any one of the three ways that is suitable, you can set up your online store. You and your customers can access your online store using the URL given in your Ai-Manager account, under the Online Store tab.
3. Making Takeaway Store Accessible for Customers
- You can add an “Order Now” button on your restaurant website, where clicking on the button takes the user to the Takeaway website.
- Similarly, you can add an “Order Online” button to your restaurant's Facebook page. Refer to “Adding an Order Button to Facebook” instruction guide to set this up.
4. Making Online Dine-in Store Accessible for Customers
Customers can access the Ai-Online Dine-in store by scanning QR codes using their devices (Mobile Phone/ Laptop). You can easily create QR codes using AiPOS or Ai-Admin.
- Launch Ai-POS.
- Click on Administration

- Click on Tools

- Click on Configurations.

- This will open the Configurations dialog box.
- Select Ai-Online Tab.

- Under the Ai-Online tab, click on Generate QR Codes.
- This will bring up a pop-up asking you to enter the Start Table number.

- Once entered, click on the Tick button.
- This will bring up another pop-up asking to enter the Stop Table number.

- Once entered, click on the Tick button.
- This will bring up a dialog box. Please select the folder where you want to save the generated QR Codes.

- Once done, click OK.
- This will generate the QR codes from the start table number to the stop table number in the selected folder.
- If you open the folder where the QR codes are saved, it will look like the below image.

- You can print out these QR codes and place them on your tables.
Ai-Menu Systems can do this for you. We offer QR codes printed on cards placedon QR card holders.
- Kindly Contact Ai-Menu Systems at 1300 or email us at sales@ai-online.com.au
for more Info.